Another blogger at the Healthy Living Summit, who had just begun her blog, asked me if I felt like I had improved — if my blog had gotten better — since I began blogging almost two years ago. My reply was, “Yes, definitely. Especially my photos”.
However, there is always room for improvement and one of the things I learned, at HLS, that I need to improve is my recipe writing.
The first session that I attended at HLS was “How to Write a Better Recipe” which was presented by Stephanie Romaine. Stephanie is currently working towards putting together the official Sparkpeople.com cookbook, so she knows a thing or two about recipes.
We first discussed what our recipe pet peeves are and then we moved on to how to improve our recipes. According to Stephanie, every recipe should have:
- Title
- Headnote and tips
- Yield (serving size)
- Prep and cook times
- Ingredient list
- Directions
– write out measurements (“tablespoon”, not” T.” or “Tbsp.”)
– be specific in measurements (“1 16 oz. can”, not “1 can”)
– no irregular capitalization (“chicken”, not “Chicken”)
– write ingredients in the order that you use them
– use articles in the directions (“pour the batter in the pan”, not “pour batter in pan”
– do not use the passive voice (“pour the batter in the pan”, not “into the pan, pour the batter”
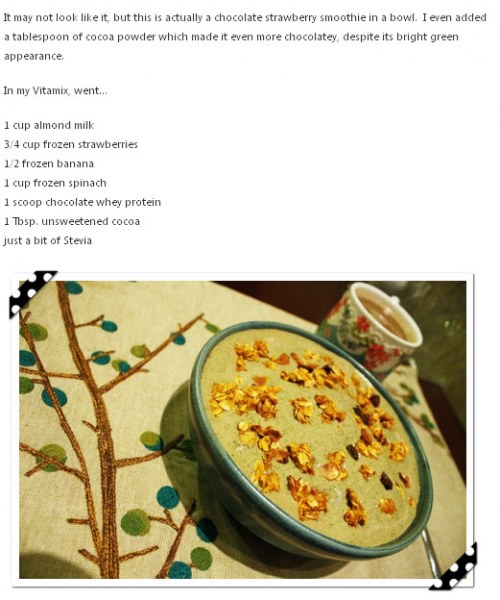
Obviously, there’s a lot of room for improvement in this post. I’m missing a lot of the key components of a recipe. Plus the photo is just God-awful. You never really know how horrible your photos are until you get a fancy camera. A DSLR will change your life.
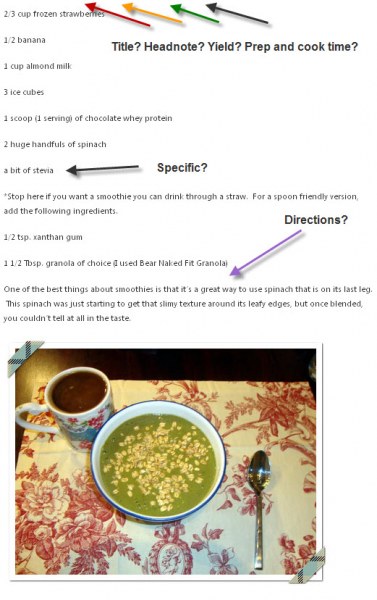
Let’s take a look at a more recent one to see how I’m doing after a year of blogging under my belt. This recipe came from a post I wrote this past February.

At least my photo is pretty. I’ve pretty much made the same exact mistakes except for being a little more specific on how much spinach to add.
Now granted, this was back when I was posting my daily eating, which means I wasn’t posting smoothies as a “recipe” per se. I just listed the ingredients loosely.
Excuses, excuses…
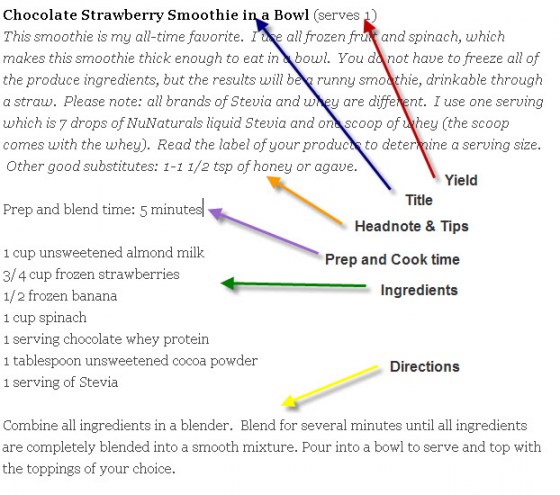
So, taking the principles I learned from Stephanie, here is how I would improve my favorite smoothie recipe.
Chocolate Strawberry Smoothie in a Bowl (serves 1)
This smoothie is my all-time favorite. I use all frozen fruit and spinach, which makes this smoothie thick enough to eat in a bowl. You do not have to freeze all of the produce ingredients, but the results will be a runny smoothie, drinkable through a straw. Please note: all brands of Stevia and whey are different. I use one serving which is 7 drops of NuNaturals liquid Stevia and one scoop of whey (the scoop comes with the whey). Read the label of your products to determine a serving size. Other good substitutes: 1-1 1/2 tsp of honey or agave.
Prep and blend time: 5 minutes
1 cup unsweetened almond milk
3/4 cup frozen strawberries
1/2 frozen banana
1 cup spinach
1 serving chocolate whey protein
1 tablespoon unsweetened cocoa powder
1 serving of Stevia
Combine all ingredients in a blender. Blend for several minutes until all ingredients are completely blended into a smooth mixture. Pour into a bowl to serve and top with the toppings of your choice.
And now for the test….
Did I include all the “ingredients” of a better recipe?
Success!
Other changes I made based on the tips I learned:
– I changed Tbsp. to tablespoon
– I was more specific about how much Stevia to use and explained why I didn’t give a measurement in the headnotes and tips portion of the recipe.
Do you know what the most difficult part of this is for me?
The prep and cook time! I have no idea how long it takes me to make my recipes, but I’m going to work on making sure I include it from now on.
Now, I have some questions for you to help me improve.
Any other things you would like to see in my recipes?
What’s your recipe pet peeve? My grandmother typically leaves out ingredients in the ingredient list, but includes them in the directions without the measurement. I think it’s a clever ploy to get me to call her.
If you’re one of my fellow bloggers, how do you think you have improved since beginning your blog?


I think my photography skills are slowly improving. I don’t have a fancy camera and I would not call myself a photographer, but I’m learning more about how to frame a photo, what angles to use, how to better incorporate lighting and being more mindful of the backgrounds.
Those strategies can really make all the difference in the world. You don’t need a fancy camera to make photos look good. Heck, my fancy camera is not help at all in some lighting that I can’t quite figure out. But my point and shoot is pretty horrible so hopefully yours is better.
This is great! The one thing I like to see is how much is a serving. Example, 1 cup of pasta with 1/2 cup of sauce. Sometimes when the recipe serves 4 but only 2 are eating, it is difficult to determine if you are eating the correct amounts without having to go through the trouble of seperating it into its portions:)
Danielle
Did you notice that I included your tip in my next recipe? Thanks for the suggestions. I’ll try to do that as much as I can.
Thank you :):)
It’s great to see what you learned in the other session! I was really torn between those two! I’ll remember these tips and try to put them into practice on my future recipes! Do you use a special lens for your food-tography and if so, what one? I have a Canon Rebel, if that matters.
I have a cannon rebel too and do not have a special lens. I’m pretty ignorant about the camera actually and probably should take a class. Through trial and error, I think I have figured out the best way to shoot food in my kitchen, but everything else looks good completely by chance. You should see all the outtakes. 🙂
LOL I know the feeling. My husband makes fun of me for using the Automatic mode because sometimes I am too hungry to eat what I made to bother fiddling with all of the settings! Getting a DSLR for dummies book is in the near future plans.
very informative post. i enjoyed this lecture too! i have already put what I learned into practice…and I think my recipes are looking a lot better! The hardest part for me is prep/cook time too…but I do my best at estimating!
Yes, also serving size is a bit difficult for me for certain things like hummus and soups. I tend to make huge amounts of soups and have no idea how many meals I can get out of it.
Thanks so much for sharing! I never really have thought about different recipe formats and their readability… I really like the addition of substitutions and tips since not everyone always has the exact ingredients on hand, it makes the recipe more versatile!
They asked us about our pet peeve at the beginning of the session and mine was “ingredients that I don’t have and can’t easily find”. So I try when possible to put in substitutions. I hope someone finds it helpful.
I loved this session, too! Definitely a lot of good info that I needed to be reminded of.
Unfortunately, I still don’t have a DSLR so my photos still pretty much resemble your bad ones. Womp womp. 🙁
No, they definitely do not resemble my old photos. I don’t know what’s up with my point and shoot, but I think it’s just exceptionally bad. Your photos are great!
When I first got married, my mother-in-law would give me some of her recipes so that I could make her son his “favorite” meals. I remember that her list of ingredients would always drive me crazy because I had no clue what measurements she was using. My favorite time was when she gave me a recipe for lasagna and it called for a “moon of cheese”. Umm, exactly how much is a moon? And what type of cheese. Pretty soon I just quit asking for recipes. Now MY healthy recipes are my husband’s favorite and I reallly know the importance of listing all measurements on a recipe!
Haha, so cute! Your pictures are AMAZING and great job improving your recipe look.!